OPNsense Cloudflare DDNS Setup - Point Your Domain to a Dynamic IP
Do you want to access your OPNsense firewall and its exposed services publicly over your own domain name, but have a dynamic IP address? Read this article! I will go through how to set up dynamic DNS (DDNS) in OPNsense using Cloudflare quickly and easily.

Prerequisites
When you have finally got your OPNsense firewall up and running, you may want to set up things like your own VPN server or a publicly accessible website hosted on-premises. If you have a static public IP address, this is pretty simple to do, you just set up DNS A-records pointing to your server’s IP and it's done. But if you only have a dynamic public IP address (which, most people having a regular ISP at home do), it's a bit more complicated than that. If you just set up a regular DNS A-record to your current IP, it may be switched out at any time and then, your own domain is pointing to someone else’s IP address and server which is not good!
To solve this, you can use something called DDNS. This is a quite magical tech that simply always updates your DNS A-record with your new IP, when you get a new dynamic public IP address lease from your ISP. This is done by a daemon running on your firewall that's checking the IP address at regular intervals, and if it discovers a change of the IP address, it will send a request to your DNS provider’s API with the domain name and the new IP address, and it will be updated automatically.
Note: This still requires a public (dynamic) IP address. It will not work if you are behind CG-NAT (i.e., your ISP is NATing your traffic one more time so the WAN connection on your firewall still gets a private IP address). If you discover that you have this, you have to call your ISP and order a public IP address, either a static or a dynamic one (which is usually cheaper).
Cloudflare setup
Before configuring OPNsense, you first need to create the DNS record and generate an API key on Cloudflare for your domain.
DNS record creation
You are now going to set up the DNS A-record which is going to be used to point to your firewall. You do this by logging in to the Cloudflare dashboard, clicking the domain name you want to use and go into the "DNS" -> "Records" tab, which looks like below.
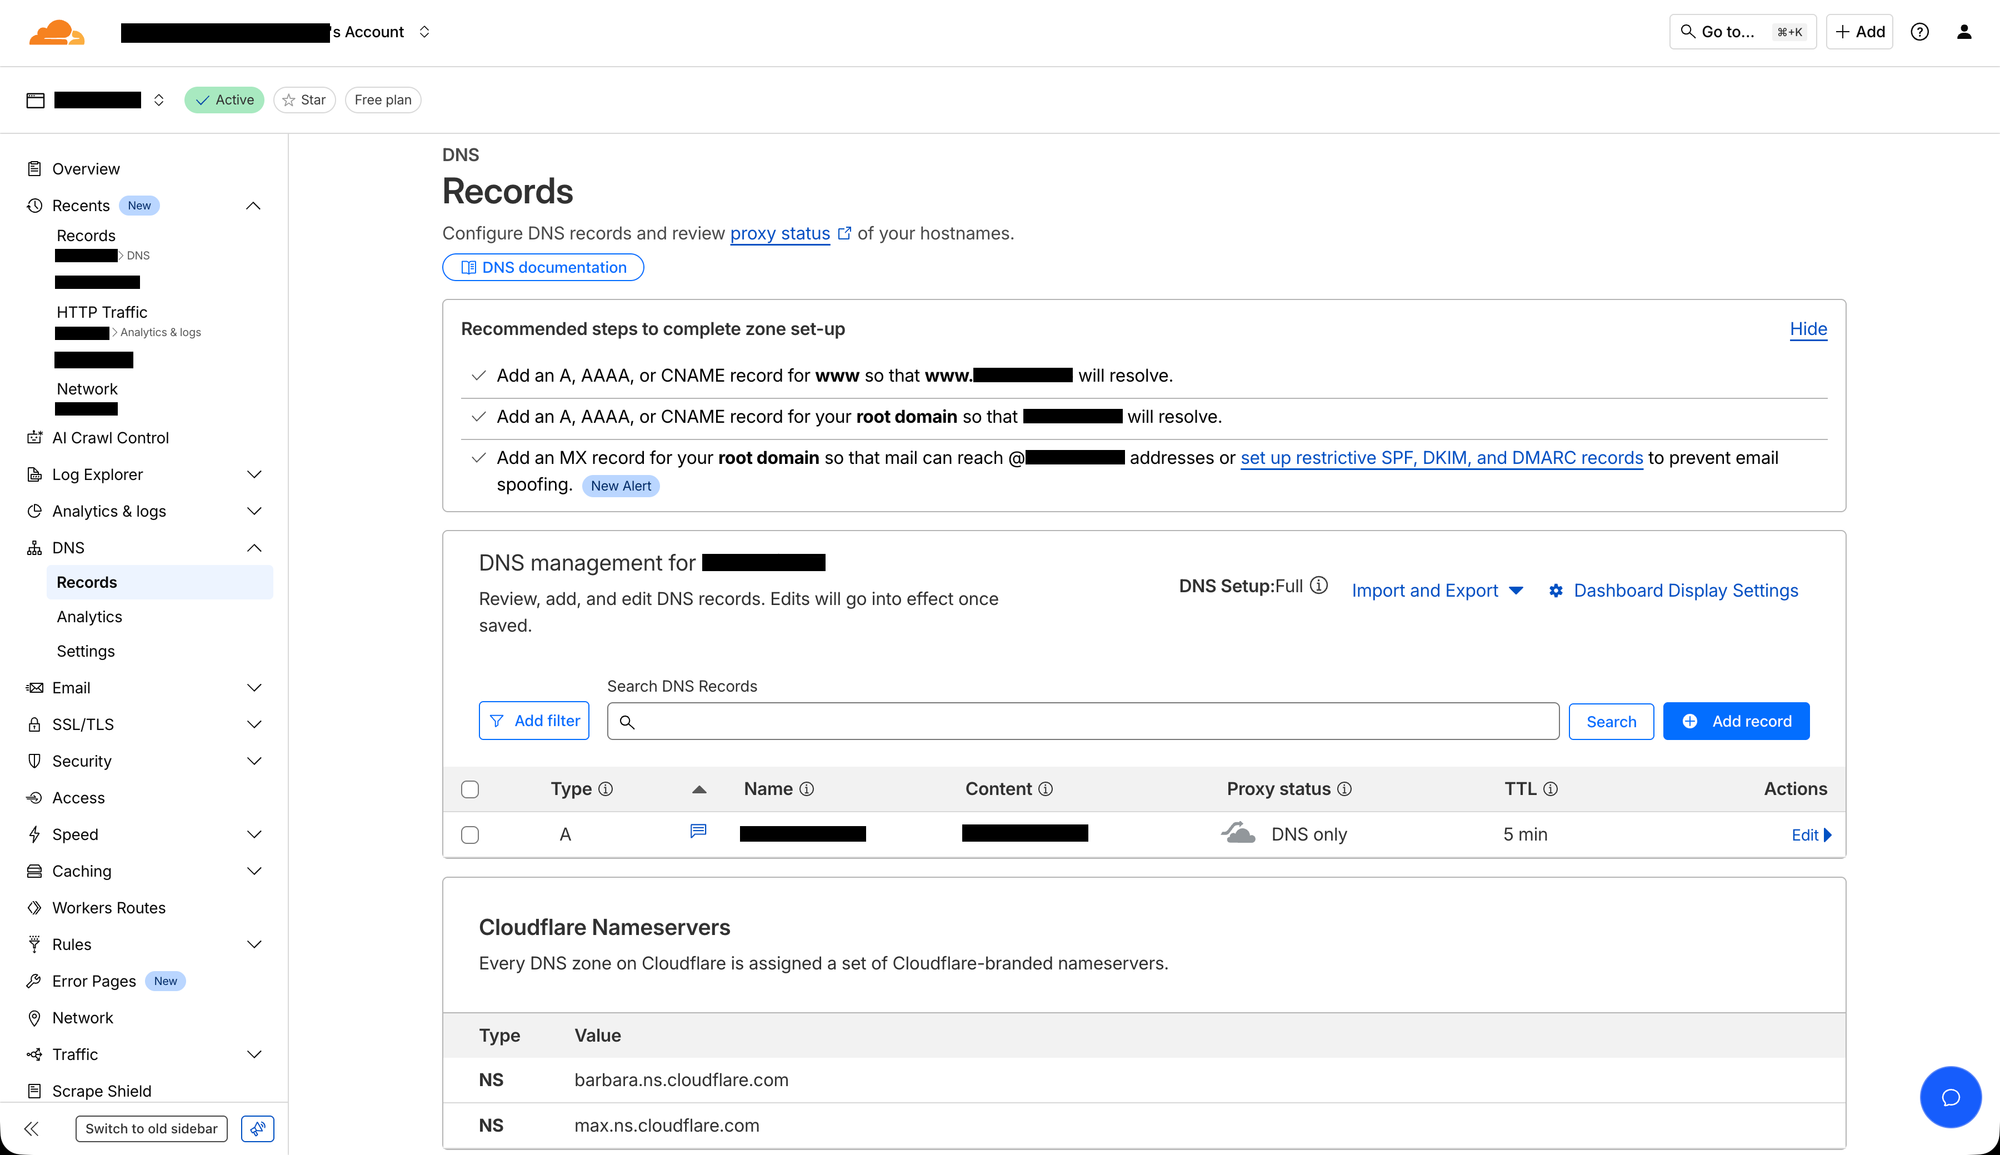
Then, click the blue "Add record" button, choose a "Type" of "A", "Name" should be the subdomain for reaching the firewall (often something like "dc01"), "IPv4 address (required)" needs to have a placeholder IP address of "0.0.0.0" for now (the field just can’t be empty, but it will be changed to the correct one automatically later), turn off "Proxy status", set a "TTL" of "5 min" (for optimal DDNS performance) and a descriptive comment under "Record Attributes" (for documentation). It should then look something like below.
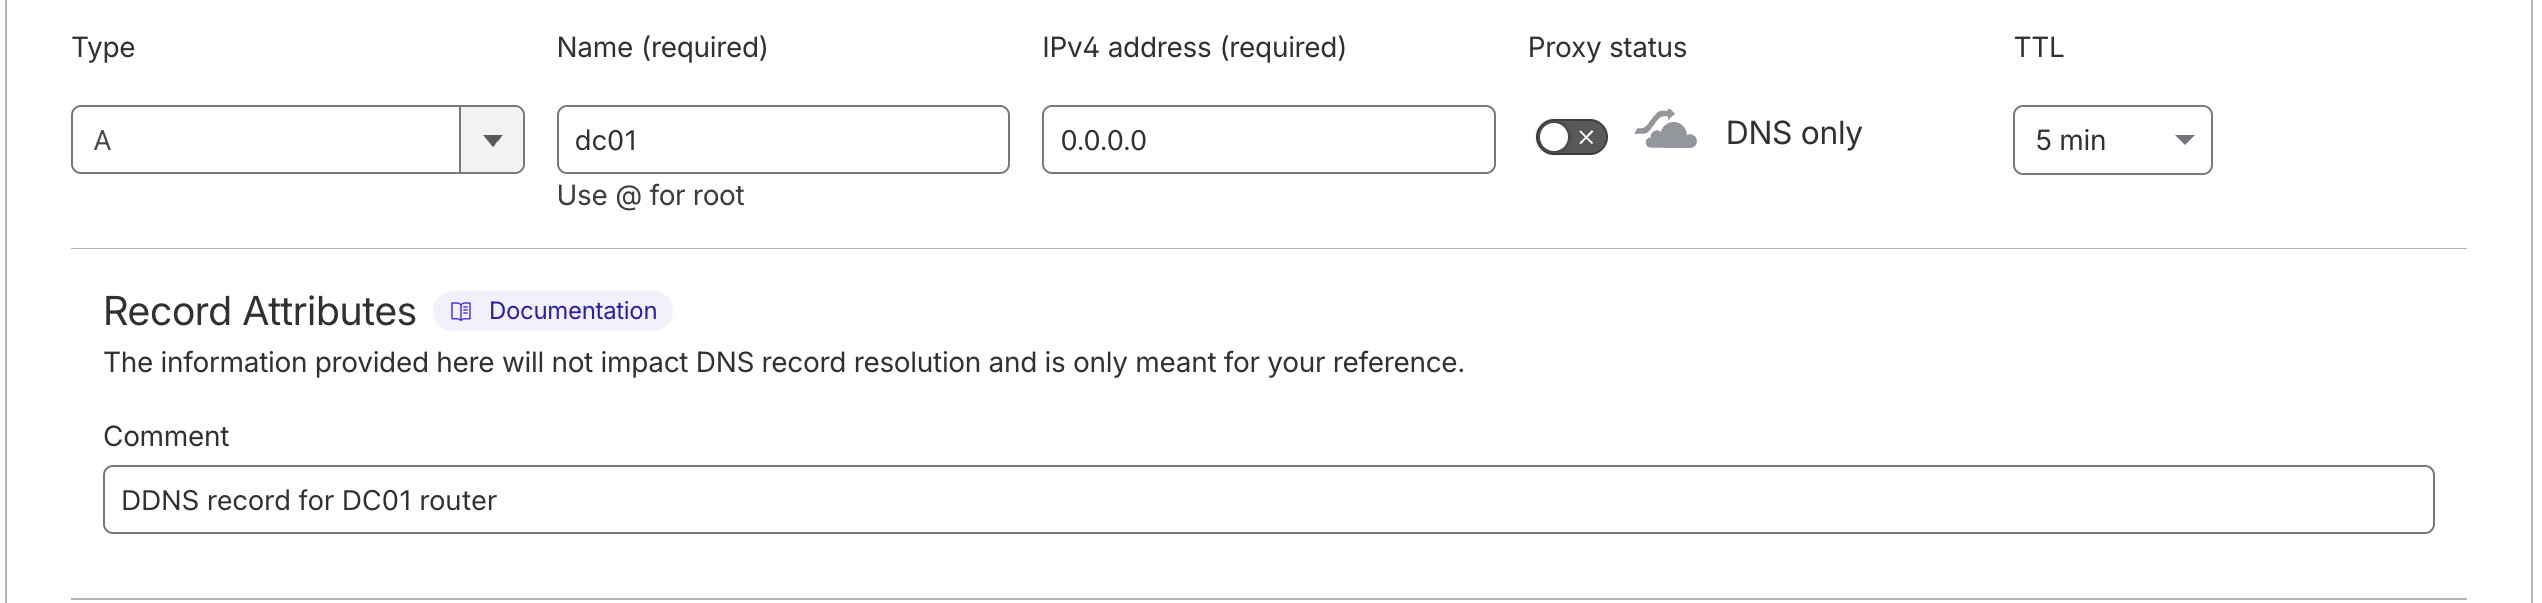
Then click "Save".
API key creation
You also need to generate an API token in Cloudflare for your domain. You do this by simply going into your profile, open the "API Tokens" tab and then click "Create Token". Then, when you reach the "User API Tokens" page, you will see some options of different API token templates like below.
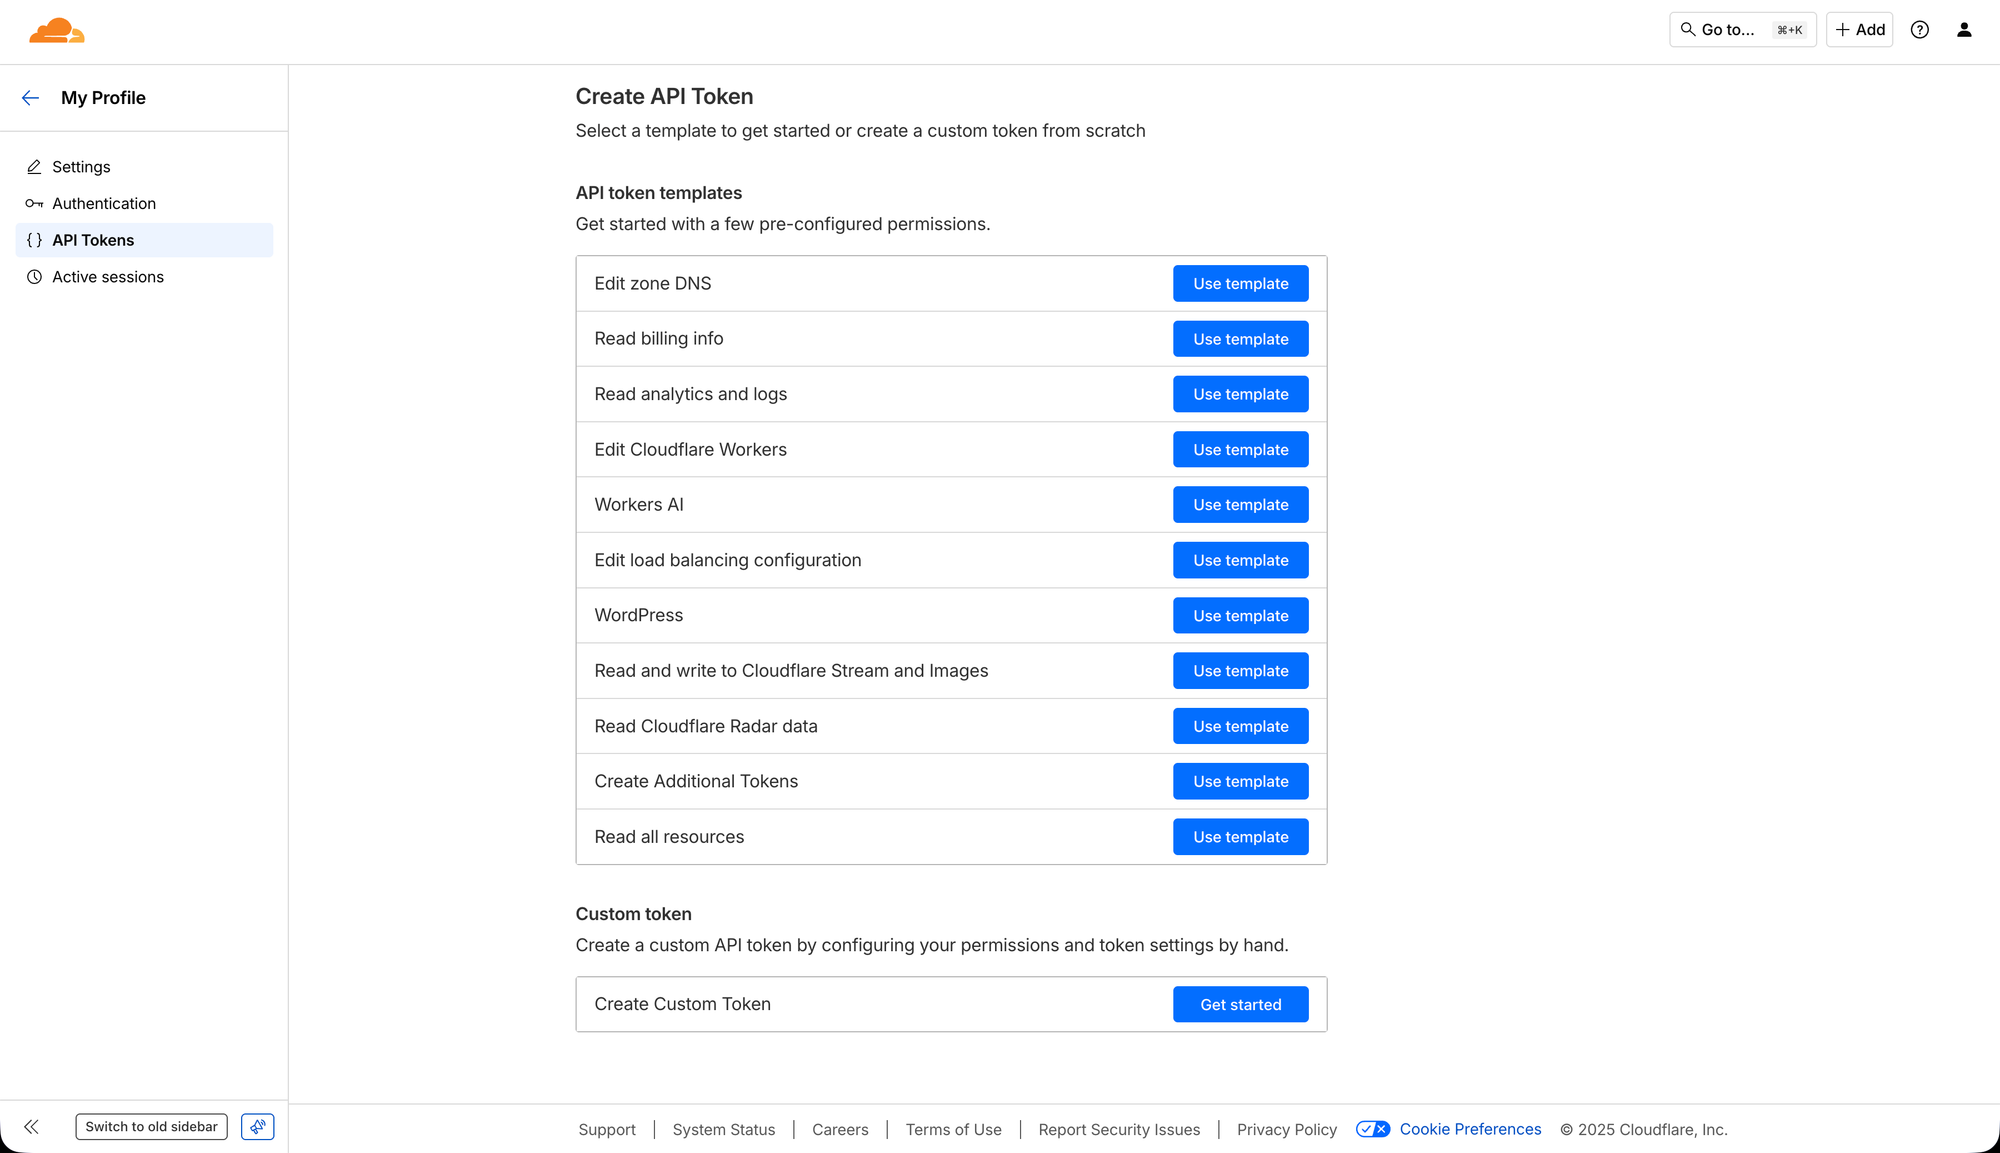
Here, you should choose the first option, the "Edit zone DNS" template.
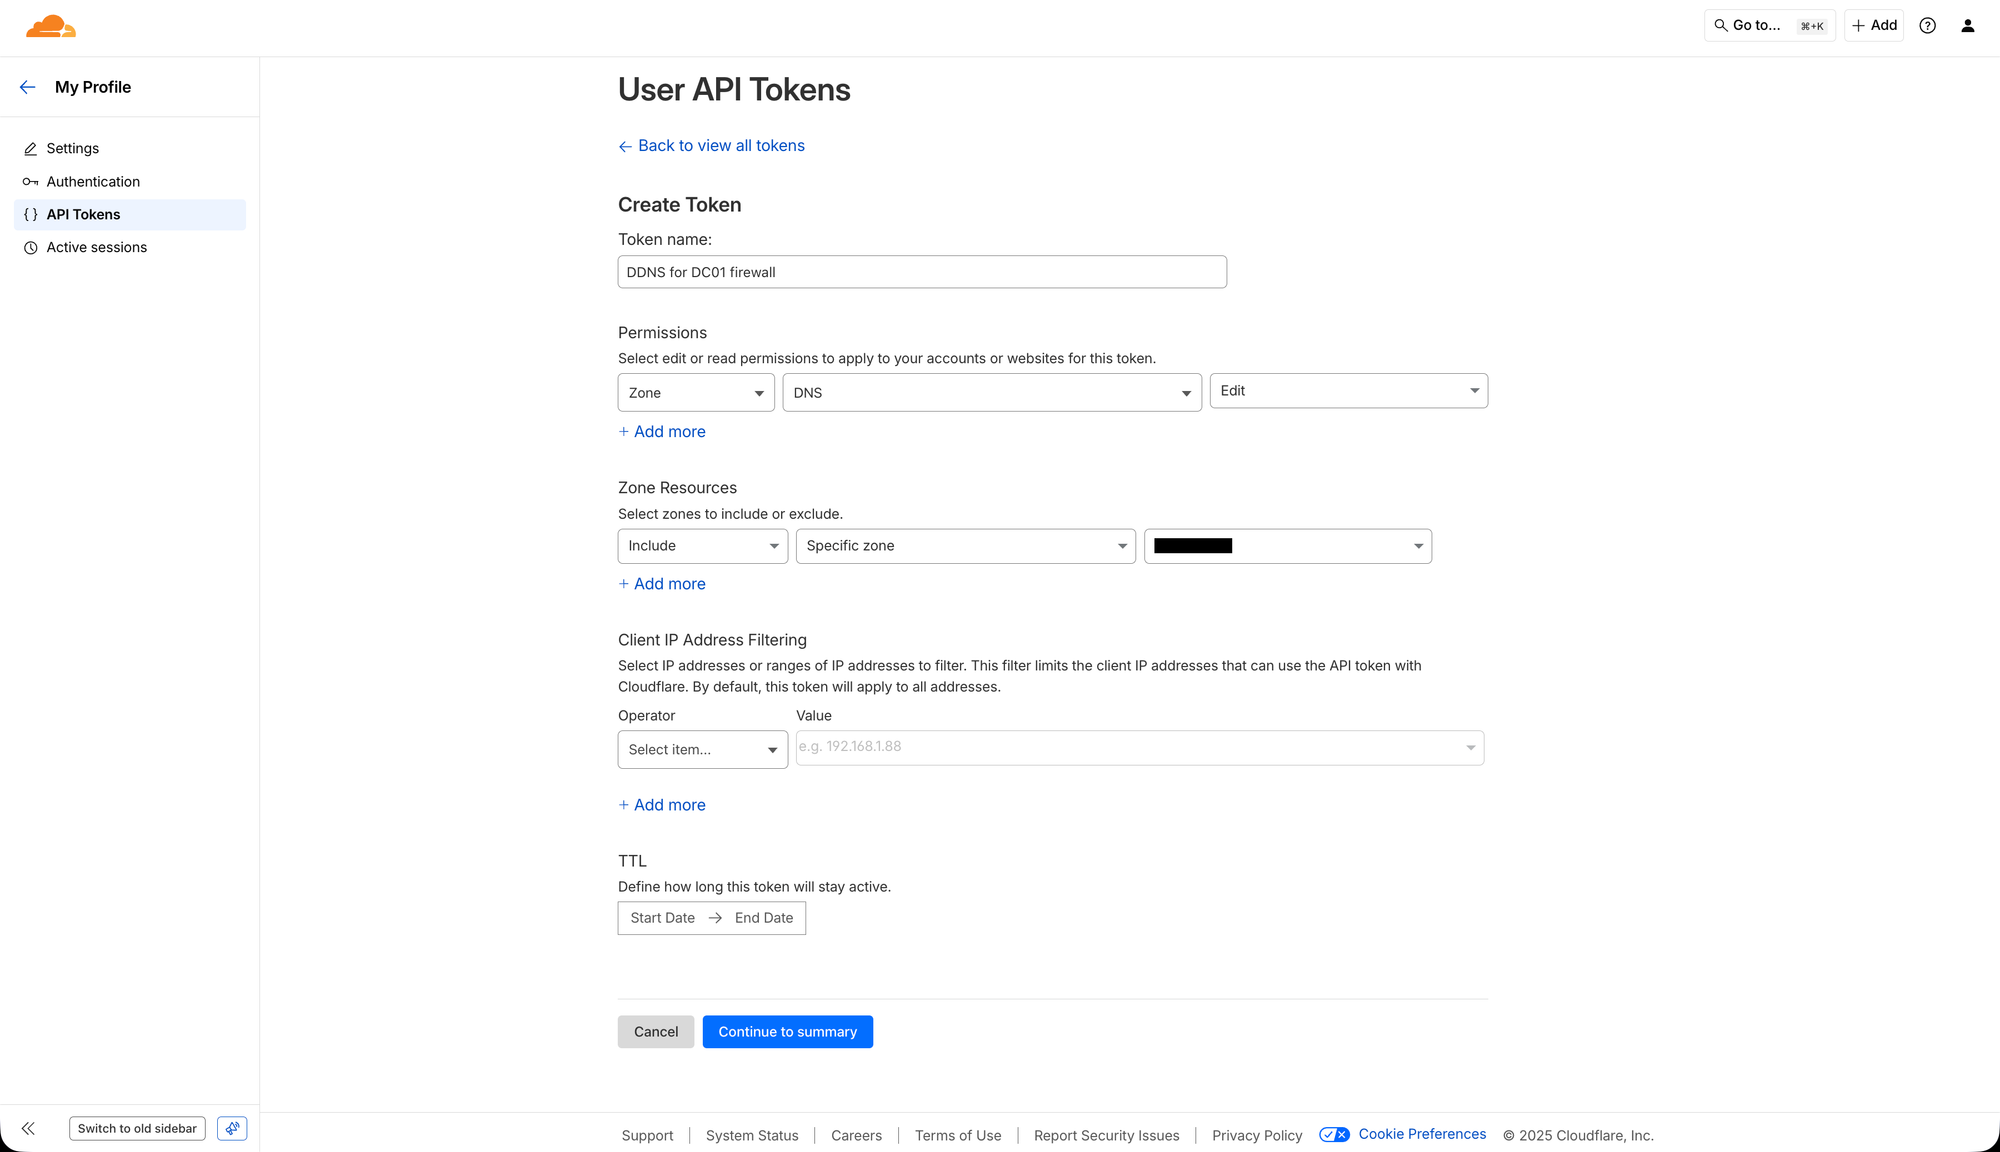
On the "Create Token" page, you should first start off by giving the token a descriptive name. I usually name them like "DDNS for DC01 firewall". Then you need to set the "Permissions" to:
"Zone" - "DNS" - "Edit"
Which will give the API key access to edit the DNS in a specific zone. Then you need to set the "Zone Resources" to:
"Include" - "Specific zone" - "[your domain]"
Which will specify that the API key will only be able to modify the specific domain’s zone that will be used for the DDNS. Then, you can skip "Client IP Address Filtering" since you don't know what IP address range you can get. You can set a "TTL" if you want, and it's generally recommended for security reasons, but then you really need to remember to manually create a new API token and update your OPNsense DDNS configuration every time it runs out. It should now look something like below.
Then, click "Continue to summary", review so everything looks right and then click "Create Token". Now, copy the token and store it somewhere safe! It is not possible to view it again, so if you lose it, you need to recreate the entire API token.
OPNsense setup
Now, we need to configure some a few settings on the OPNsense firewall to actually use the Cloudflare DDNS.
DDclient plugin
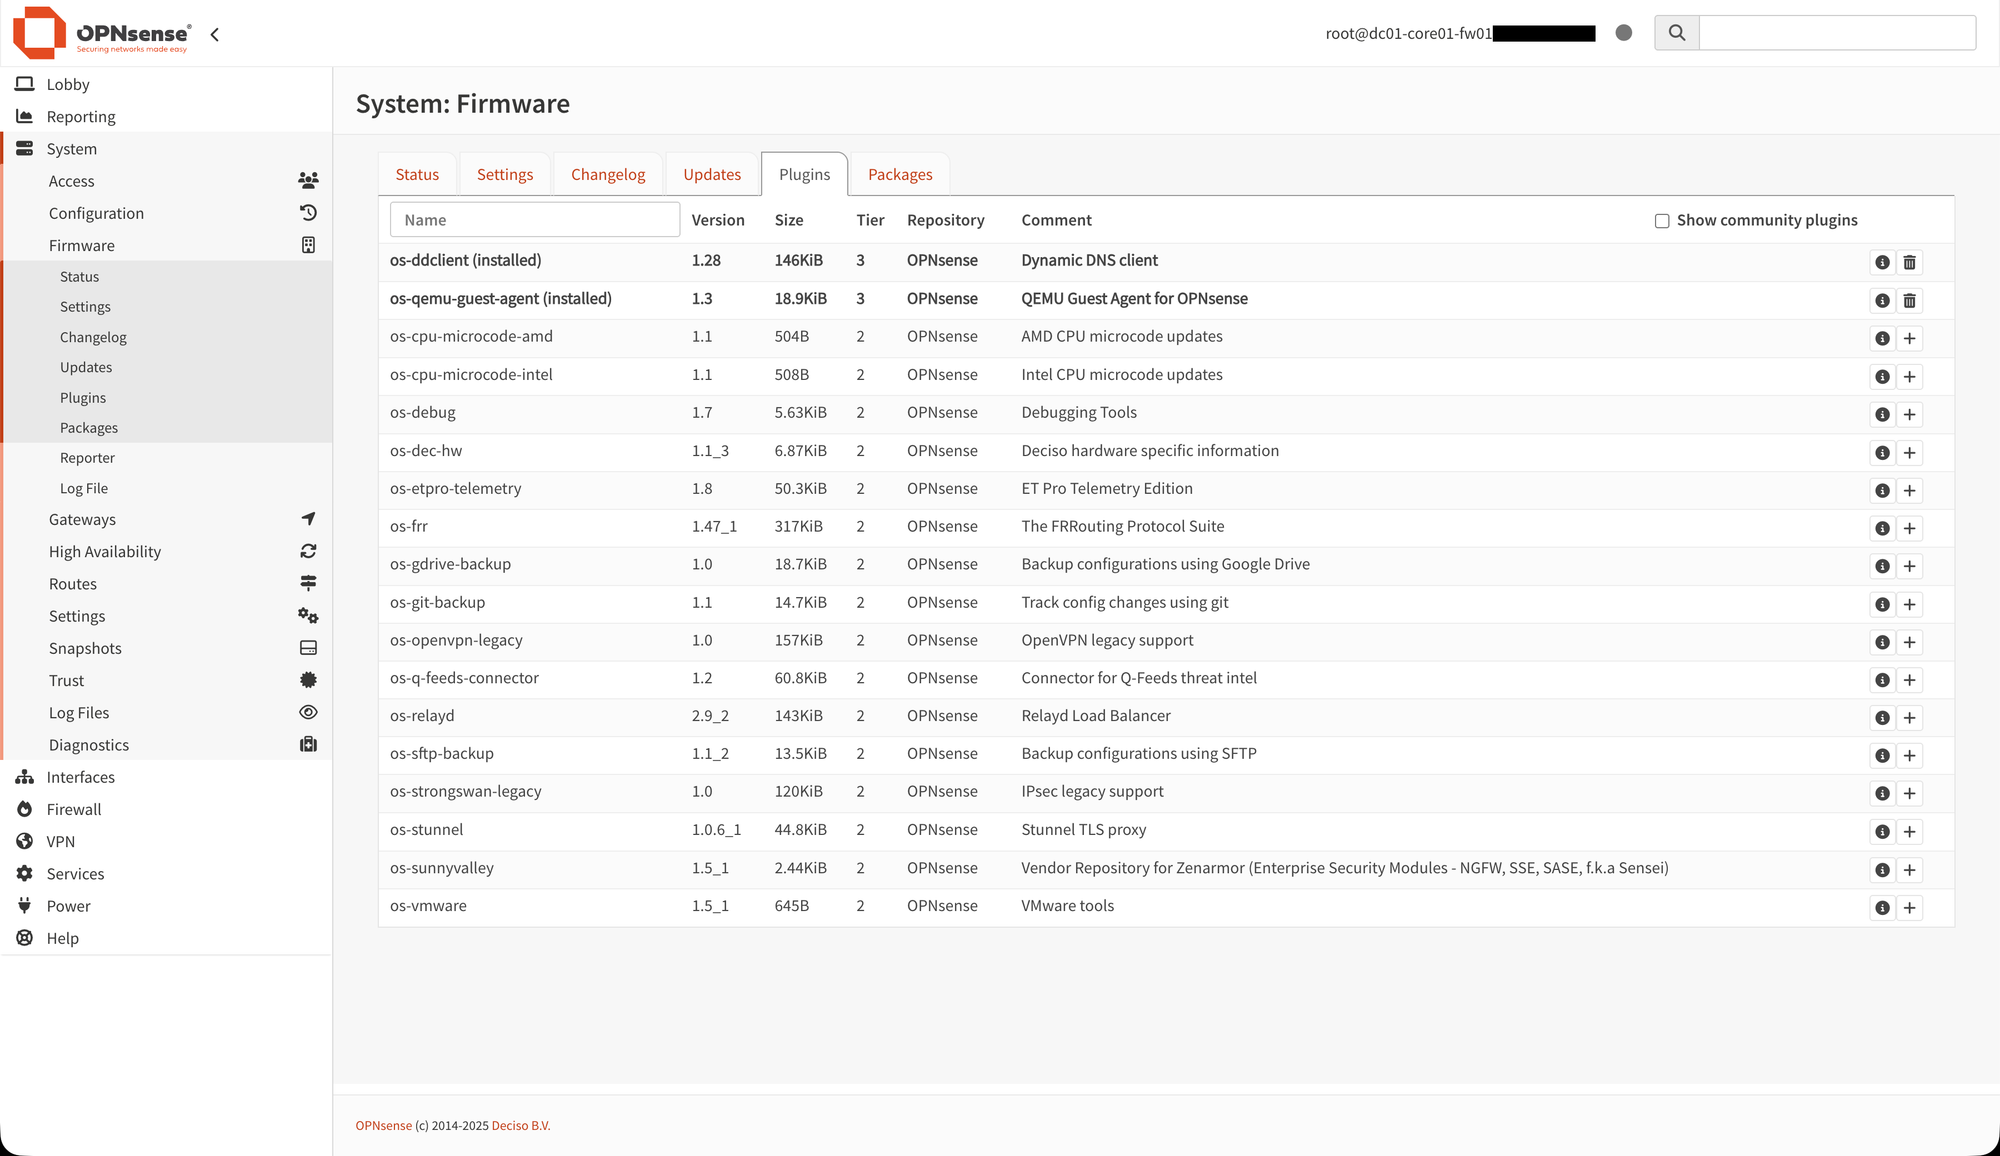
You first need to install a plugin for the DDclient backend, which is a Perl client used to update dynamic DNS entries for accounts on many dynamic DNS services (including Cloudflare). You do this by first logging into your OPNsense Web GUI, then navigating to the settings page "System" -> "Firmware" -> "Plugins". Then, find the ‘os-ddclient’ plugin and click the "+" button (install). It should then look like below.
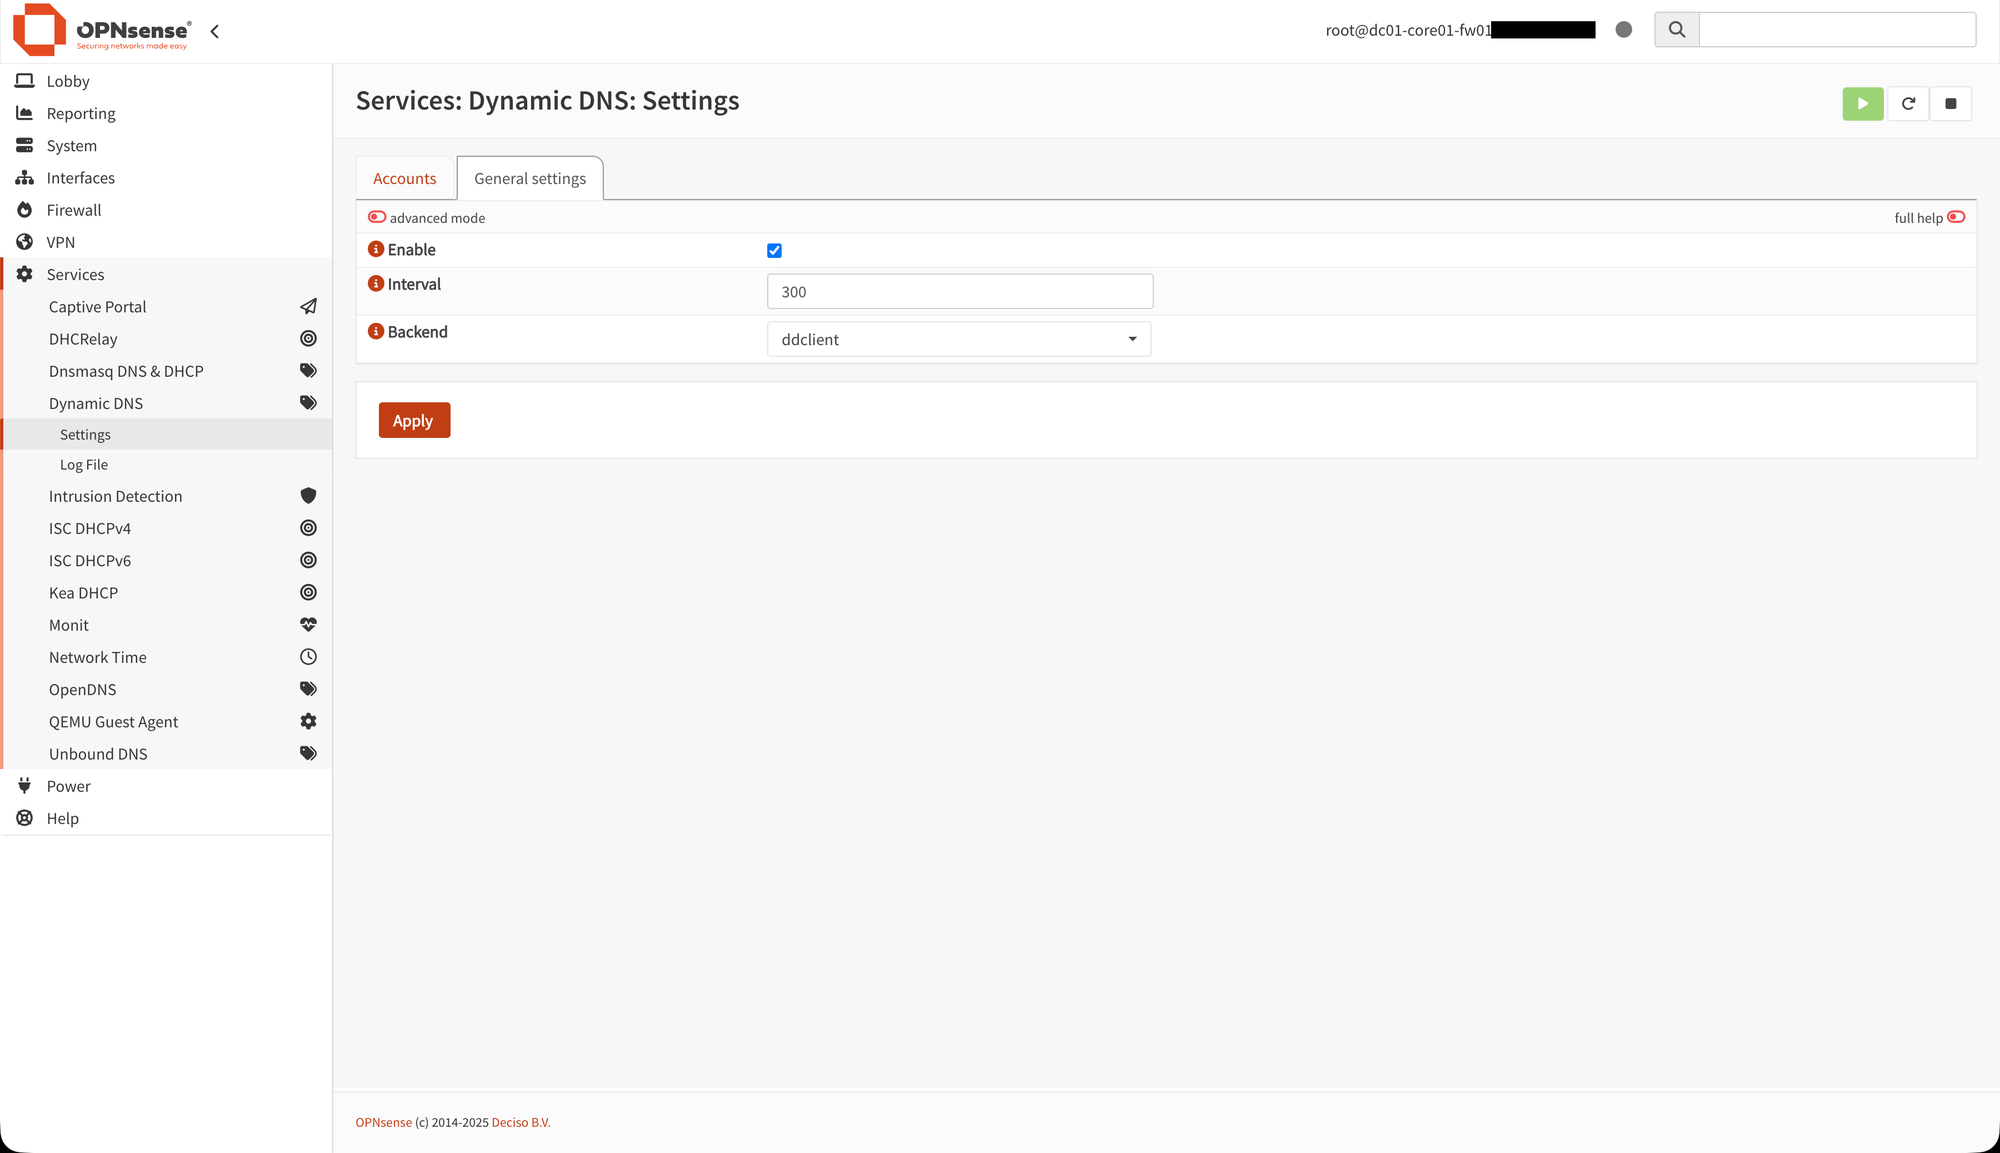
After that, you need to head over to the DDNS settings under "Services" -> "Dynamic DNS" -> "Settings" and the "General settings" tab. In there, you should:
- Check "Enable"
- Set "Interval" to "300" for optimal DDNS performance
- Select "ddclient" as "Backend", to actually use the DDclient plugin
Then, click "Apply". It should now look like below.
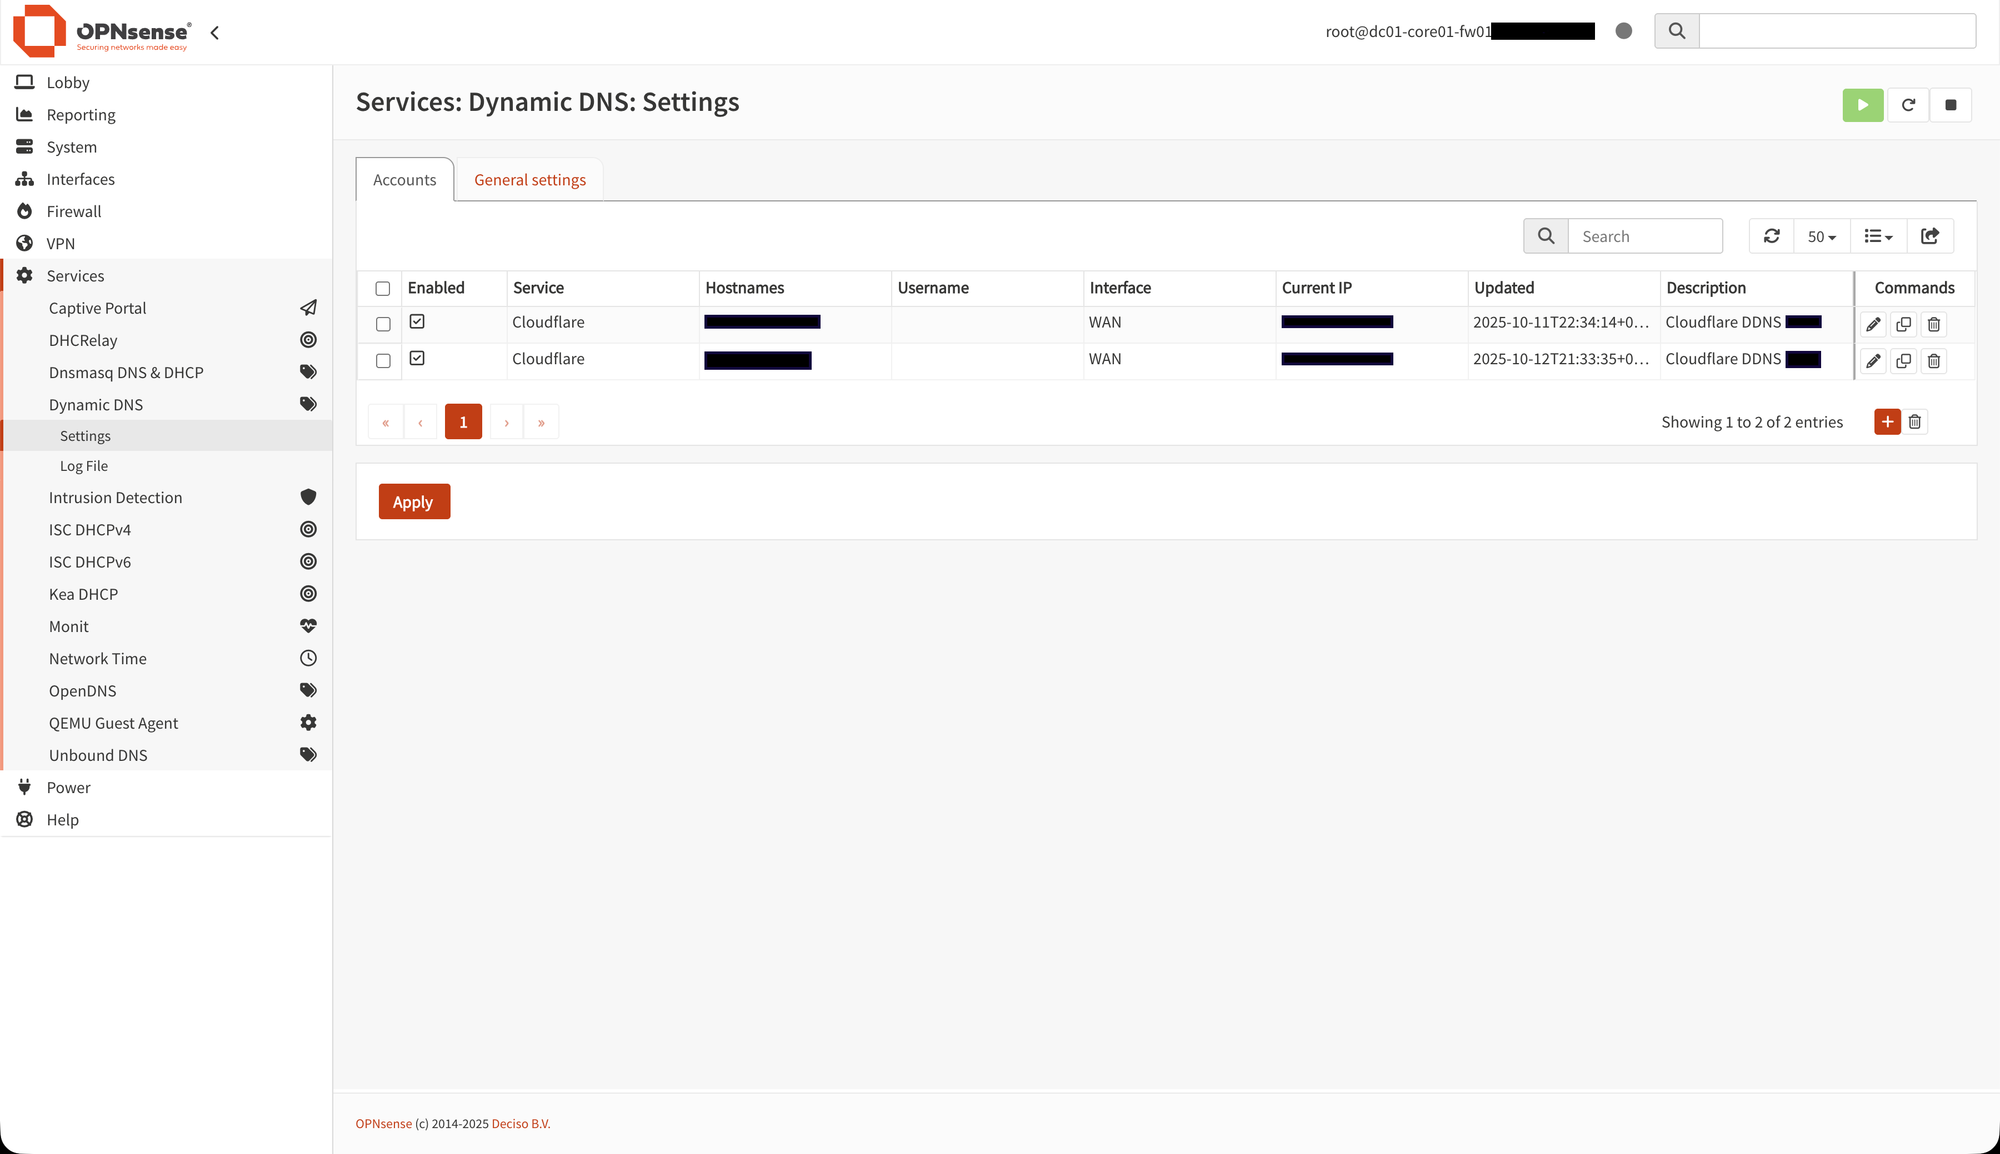
After that, head over to the "Accounts" tab and click on the "[+]" (Add) button in the table. Now, you are going to set up your Cloudflare DDNS account. In the form that pops up, you should do:
- Check "Enable"
- Write an informative description about what it's used for in the "Description" field
- Select "Cloudflare" in the "Service" dropdown
- "Username" should be left empty, since it isn’t required for using the API Key
- In the "Password" field, paste your earlier generated Cloudflare API Key
- Write your domain name in the "Zone" field (the zone this DDNS record belongs to)
- Enter the desired FQDN (the hostname you want to reach this firewall on, matching the A-record you created earlier) in the "Hostname(s)" field
- Set ”Check ip method" to "Interface" to make it check if the IP is changed on the interface, to trigger the DDNS API call
- Then, set "Interface to monitor" to "WAN" to monitor the WAN IP address
- Set "Check ip timeout" to "10", it shouldn’t take longer than that
- Check "Force SSL" to secure the connection
Then, click "Save". Everything should now be done, and it should look something like below.
You may need to restart the service (or even the OPNsense VM or replug the physical WAN cable) for the DDNS to take effect. And remember that the TTL and timeout may hinder it for a few minutes, so it's not guaranteed that you will see results immediately. But it should be working within 10 minutes, otherwise, you should check the logs for errors under "Services" -> "Dynamic DNS" -> "Log File".
Now you are all set! If you have any thoughts, corrections or questions, please write them in the discussion section down below or reach out to me on LinkedIn!
Thank you for reading! You are now ready to run publicly accessible services from your home network. :)