Proxmox + OPNsense Setup - The Core Server
Ever thought about running a high-power, enterprise firewall virtualised on your server? And how to install and set up Proxmox for core server usage? Check this article out! I have explained everything, how you go from configuring the BIOS to setting up OPNsense VLANs.


Prerequisites
Every homelab needs some kind of firewall or router. This can be done in different ways, at big corporations you usually see a physical "hardware router" such as a Cisco ASA, but this can be very expensive and not too flexible. Because of that, I (and many others) like to run my router virtualized as a virtual machine on my core server. This is both cheaper because the router firmware is free, but it also consumes less power with one less physical machine. It's also a good future-proofing since a virtualized firewall can be continually updated, currently with no set EOL date.
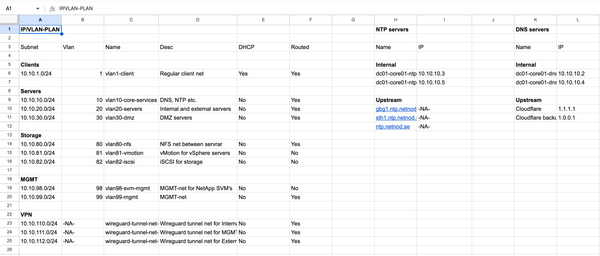
In this article, I will go through how to install Proxmox on your server and then set up OPNsense with VLANs and corresponding Linux VLANs and Bridges on your Proxmox host, all with best practices in mind. I recommend you to first read my article about IP/VLAN-plans, for a better understanding about what I'm doing.
Note: It was a while ago that I actually did this on my server, so there may be some missed steps in this article. So if you follow this as a guide and stumble across any errors, please write them in the discussion section and I will make sure to find a fix and update the article ASAP.
The server
Hardware
Before we start setting up Proxmox and OPNsense, we first need to prepare the server physically.
I am personally using an old Dell Optiplex 3020 desktop because of its small form factor, quietness and power efficiency. Even though it's an older normal PC, it's still more than enough for a core server and at the time of writing, it's currently running six LXC containers and seven full-size VMs. The only thing I've done to it hardware-wise is to add some more RAM and two more NICs, which I strongly recommend to do. The current setup is as follows:
- CPU: 1 x Intel Core i5-4570
- RAM: 2 x 8GB DDR3 1600 MT/s
- SSD: 1 x Samsung 850-Series EVO 500GB
- NIC 1: Built-in (LAN)
- NIC 2: TP-Link TG-3468 (WAN)
- NIC 3: TP-Link TG-3468 (OOB MGMT access)
BIOS
You also need to configure the BIOS correctly. I generally recommend to turn on UEFI (and Secure Boot if possible), and then also Intel Hyper-Threading, and any virtualization techniques available (such as VT-x, VT-d and SR-IOV support). Then you can continue on to the Proxmox installation.
Proxmox installation
You are now going to install the Proxmox hypervisor on your server. For this to work, you need to connect the server to your existing router (like a regular server) for downloading updates etc. We will transition it to an OPNsense router later.
Creating bootable installation media
First, you need to create a bootable USB with the Proxmox VE installer. For this, you need a USB stick with at least 8GB of capacity, download the ISO installer from Proxmox official website and then use either Rufus (on Windows) or Balena Etcher (on macOS) to create the bootable USB. I mostly use Rufus on Windows though since I have found it to work better on older systems. I then recommend using "GPT" as partition scheme, "UEFI (non CSM)" as target system (supports UEFI) and "FAT32" as filesystem.
When your bootable Proxmox VE installation USB is done, you can plug it into your server and select it in the boot menu. Before doing this though, I recommend to go into your IP/VLAN-plan, reserve an IP address in the MGMT VLAN and create a hostname for the PVE / core server based on your hostname naming convention. Also, note your server's FQDN and the network's DNS search domain for later. You will probably not be able to use your new IP address yet though (since the VLAN 99 subnet doesn’t yet exist), so during the graphical Proxmox installation, just set up a random static IP address in your old network's LAN range so you can install and update the server. I'm going to give my server the hostname "dc01-core01-pve01" (Proxmox Virtual Environment 01 at Core Rack 01 in Datacenter 01).
Installing Proxmox
When you have booted into your Proxmox VE installation USB, you should select:
Install Proxmox VE (Graphical)
Then, after you have accepted the EULA, you will be able to pick the target disk for the installation. In my case, I only have a single drive in my system so I will therefore pick that drive, but in an ideal setup, you would have a smaller dedicated boot drive. By default, it’s going to use EXT4 but you can of course switch to ZFS if you want the extra benefits, either as a single-disk ZFS pool or by creating a mirrored ZFS software RAID1 boot drive with multiple disks. But I will stick to EXT4 since I only have a single disk and it’s a little less wearing on SSDs.
Then, you should select your country, time zone and which keyboard layout you use. It's important that this is right, because otherwise, your connected keyboard will act weird.
On the next page, you should set up a password for the root user. I generally go for generated passwords (with a password manager) for the extra security, but I do understand that a few people find it annoying with such long and random passwords so it's totally okay to use your regular here. Then enter your current email address. This feature will not be used though, if your server is sitting in a home network (with SMTP ports blocked from your ISP) and I anyway recommend setting up other monitoring systems later. More on that in another article.
Then, you are going to configure the management network. First, choose your dedicated OOB MGMT NIC (which should be the only NIC connected to your current router), enter the FQDN hostname, and then enter the temporary IP address (on your current router’s LAN range) as well as the gateway and DNS server. But don’t worry, this will be changed later. Then you should verify the settings and click "install".
Configuring Proxmox
Updating and post-install scripts
Now, you should be able to access the Proxmox web interface on:
https://<specified IP>:8006
And the default login should be:
Username: root
Password: <root password set previously>
When you have successfully logged in, I recommend that the first thing you do is to select the node under the "Datacenter" menu to the left, go to the "Shell" tab and run the PVE Post Install helper-script. This will do stuff like enabling the community repositories, removing the "no valid subscription" nag, disabling HA services (if you don’t need them) and updating the host. You run this script by simply running:
bash -c "$(curl -fsSL https://raw.githubusercontent.com/community-scripts/ProxmoxVE/main/tools/pve/post-pve-install.sh)"
Note: be careful with running random scripts from the internet. They can be malicious and do unwanted things, so always check them before running.
Setting up storage
If you have multiple disks, want to set up a software RAID or Ceph cluster, I recommend you to do this now. If you want to set up a regular ZFS RAID, you can do this by going into your node’s settings page "Disks" -> "ZFS", then "Create: ZFS".
I only have a single disk in my system which I run LVM on though, so I will skip this step.
I also recommend going into your Datacenter settings page "Storage". Here, you can select each disk and assign what content should be allowed to be stored on it. For the "local" (the system disk), I only allow "ISO image", "Container template", "Snippets" and "Import", not any expanding data storage since it's a real pain in the ass if the system disk gets full. Then, on the "local-lvm" (the lvm partition on the same physical drive), I do allow "Disk image" and "Container" (which is the actual expanding data of the VMs and containers). I do not allow "Backup" on any of the disks since it's best practices to run a separate / dedicated Proxmox Backup Server anyway, more on that in a future article.
Setting up network bridges for physical NICs
You should now disconnect that network cable from your current router, connect it directly to your PC and set up a static IP address in your current LAN range on your PC too (so you can access the Proxmox server directly). A network connection won’t be needed for installing OPNsense etc.
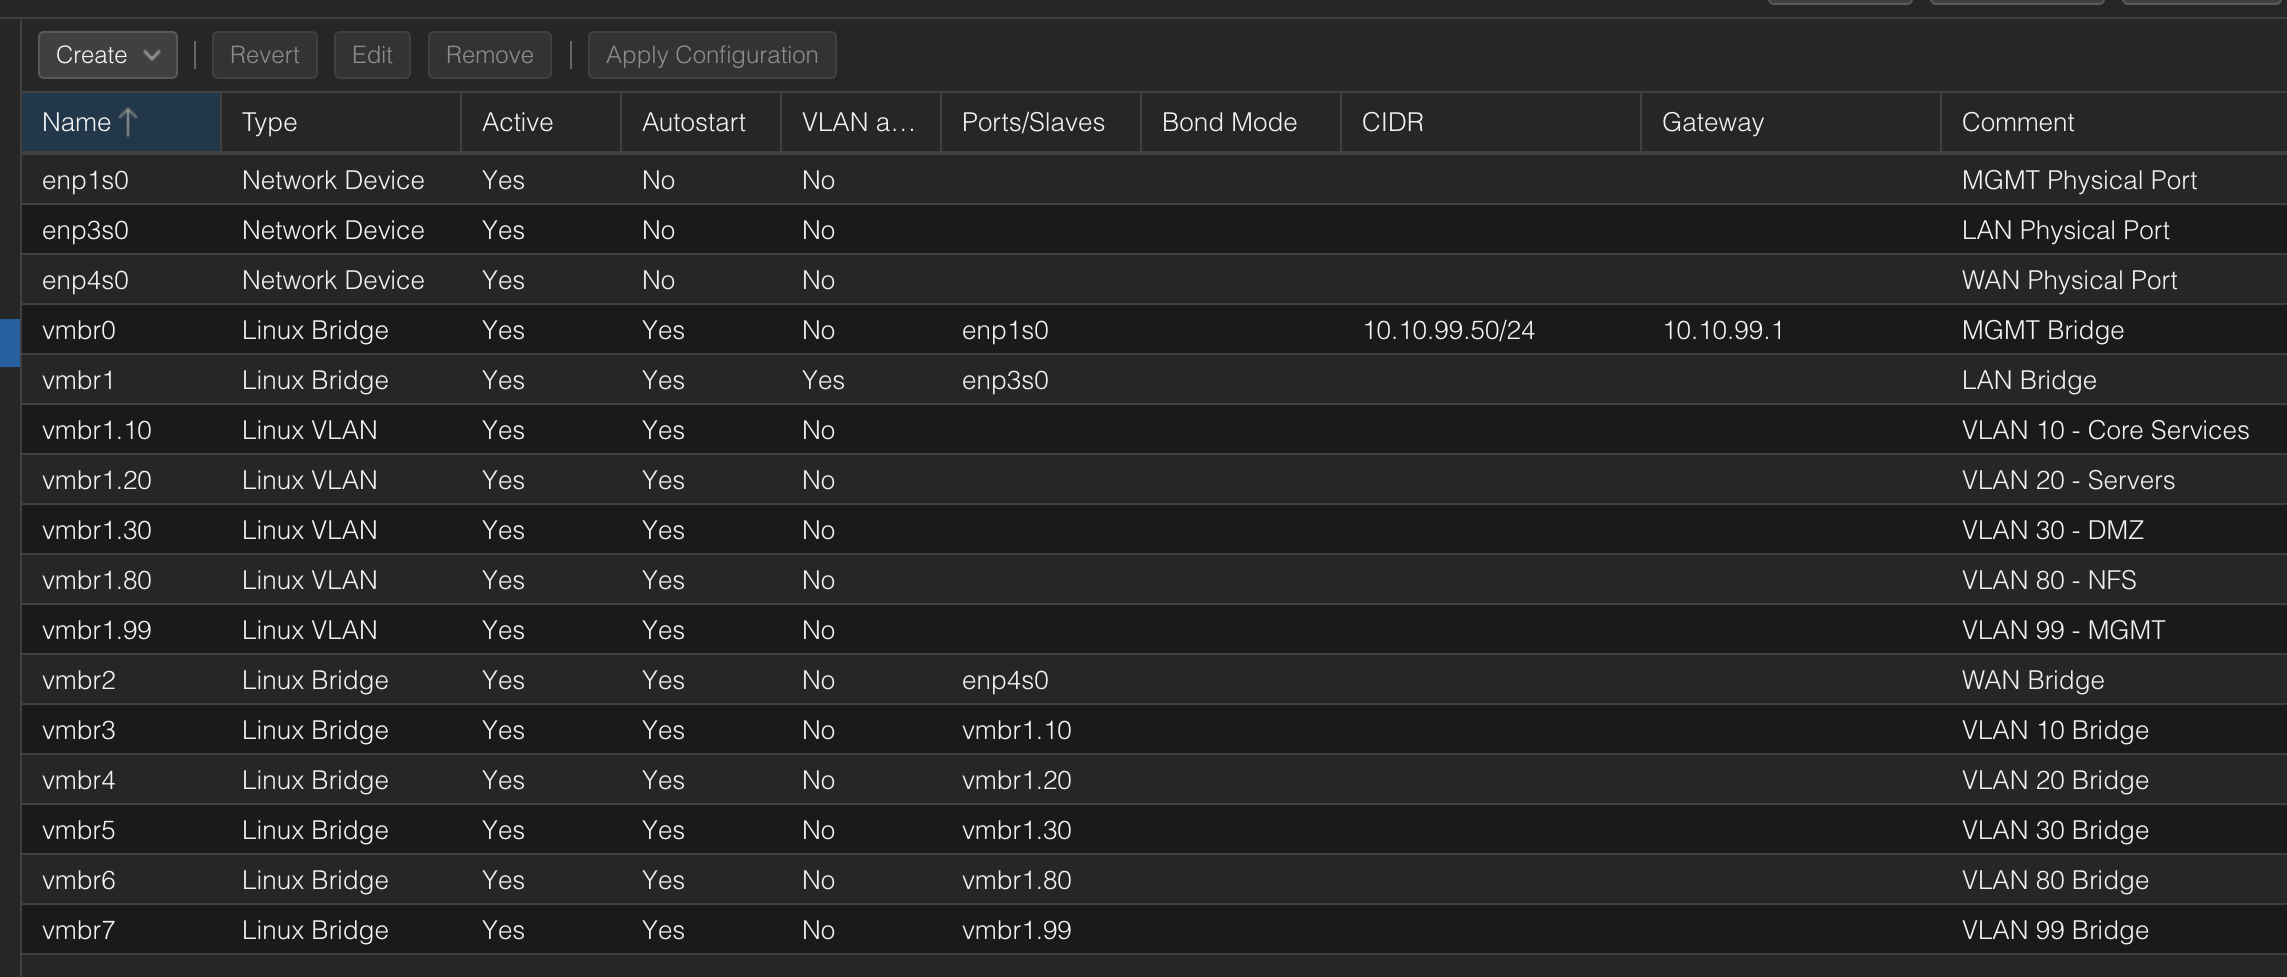
Now you are going to set up the network bridges for the physical NICs. When you go to your node’s settings page "System" -> "Network", you will see four entries in the table; Network Devices and one Linux Bridge with an IP address, which got created during the installation. You should first figure out which Network Devices in the list represent which physical port on the server, and then edit each network device with the corresponding comments "MGMT Physical port", "LAN Physical port" and "WAN Physical port" so you keep track of them.
Then, you should create one Linux Bridge per Network Device. Think of it like you are creating a virtual switch on the server, which uplink you connect to each physical network device / NIC. When creating the new Linux Bridges, you should not give them IP addresses (only the MGMT Bridge should have one). Also, only the LAN Linux Bridge should have "VLAN aware" checked (and in my case, the VLAN IDs "10 20 30 80 99" under the Advanced settings). Other than that, you should just keep default settings on all Linux Bridges, set "Bridge ports" to the name of the Network Device that you are currently configuring and the corresponding comments "MGMT Bridge", "LAN Bridge" and "WAN Bridge". You don’t need to create a Linux Bridge for MGMT though, since this is already done.
After your Linux Bridges are done, you should set up one Linux VLAN for every routed VLAN in your network design (from your IP/VLAN-plan). You do this by creating a Linux VLAN, giving it the name "vmbrX.YY" (where "vmbrX" is your LAN Bridges name and "YY" is the VLAN ID you are currently configuring), adding the according VLAN Tag and then a comment such as "VLAN 10 - Core Services".
When your Linux VLANs are done, you should create one Linux Bridge for every Linux VLAN that you need to be able to assign to VMs on this server, so you can actually assign untagged (access) NICs to the VMs. Each of these Linux Bridges should have the Bridge Ports "vmbrX.YY" where, once again, "vmbrX" is the VLAN aware LAN Bridges name and "YY" is the VLAN ID of the new access Network Bridge. This new bridge should not be VLAN aware, just add the according comment such as "VLAN 10 Bridge". Then, make sure that Linux Bridge and Linux VLAN have "Autostart" checked. Afterwards, your network settings list should look something like the picture below:
Tags
If you want to organise your VMs and LXCs in the Proxmox GUI, it's a good idea to set up tags (i.e., labels with different colours and text). I usually just create one tag for every VLAN + one for Trunk, but you could also create tags based on functionality or operating system, and assign multiple tags to every VM.
You can do this by going into your Datacenter settings page "Options". Here, you can create "Registered Tags" with all of your desired names. Then, you can specify the colour and style of them in the "Tag Style Override" section, so you get recurring colours when assigning the tags to different VMs / LXCs.
Proxmox services
As a last step before continuing to the OPNsense setup, you can stop / disable some of the unneeded services that are running in the background in Proxmox to save resources. You can do this in your node’s settings page "System". I personally only have the following services running:
- chrony: Acts as an NTP client for the Proxmox host
- cron: Runs important (Linux) background services for the Proxmox host
- ksmtuned: Tunes the kernel of the Proxmox host, do not disable
- pve-cluster: Even though the host is not currently in a cluster, it's still needed for the overall filesystem for the VMs and containers
- pvedaemon: The Proxmox API daemon used for managing the hypervisor, do not disable
- pveproxy: Proxy server for the PVE API
- pvescheduler: Schedules and runs specific services used for Proxmox, do not disable
- pvestatd: Queries the status of VMs, containers and storages and sends the result to the nodes / Proxmox kernel
- sshd: The SSH server of the Proxmox host. Best practices to keep on for OOB management and for operations that cannot be done in the Proxmox Web GUI, but can be turned of if very strict security reasons
- systemd-journald: A system service that collects and stores logging data for the host
If you want to stop a service completely, you also need to run:
systemctl disable --now [service name]
And
systemctl mask [service name]
So it won’t start again after the next reboot.
Proxmox firewall
Since I'm going to use the firewall in OPNsense, I am not going to use the built-in firewall in Proxmox for now. But, I may look more into it in the future, if it enables extra security or if it's just enough with the firewall in both OPNsense and Uncomplicated Firewall (UFW) on all VMs and containers.
OPNsense installation
Now, it’s finally time to set up the virtual machine and install OPNsense!
First of all, you need to download OPNsense. You can do that from their official website. There are a few download options though that can be pretty confusing, but I recommend choosing the "amd64" system architecture and then the "dvd" image type. There are a lot of different opinions on this but the DVD option is the most modern one and best suited for running as a VM in Proxmox since it is running in VGA mode, supports UEFI boot etc.
When you have downloaded the OPNsense ISO file, you need to go into your Proxmox node's "local" storage (where your ISO images and container templates are stored). Then, click on the tab "ISO Images", the button "Upload" and select your OPNsense ISO file to upload it to the server's ISO storage.
VM setup
Now, we are going to create the virtual machine. There are a lot of different options here but I have experimented and figured out an effective, secure and scalable setup.
First of all, you need to go into your IP/VLAN-plan and reserve an IP address for the OPNsense management interface on VLAN 99. Now in the beginning, you will be able to access the management interface on all VLANs though, since inter-VLAN routing isn't set up yet.
Then, right click on your Proxmox node under the "Server view" and click "Create VM". Give it the hostname that you reserved for in the IP/VLAN-plan, i.e. for example "dc01-core01-fw01", the VM ID, and in the advanced settings, check "Start at boot" and give it Start/Shutdown order of 1. Then, you can also add a Tag if you want, I usually go with the tag "Trunk". Then click "Next".
On the "OS" page, you should simply just click "ISO image" and choose the OPNsense DVD ISO image. Then click "Next".
Then, on the "System" tab, you should change Machine to "q35", check "Qemu Agent" (which we will install later), change "BIOS" to "OVMF (UEFI)" and select "local-lvm" as "EFI Storage". Also, uncheck the "Pre-Enroll keys" option since it's not needed for non-Windows machines. Then click "Next".
On the next tab, "Disks", you are going to create the VMs storage disk. You can keep most settings default here but just increase "Disk size" to "40 GiB", check "Discard", check "SSD emulation" and, in most setups, check "Skip replication". Then click "Next".
Now, on to the "CPU" tab. It’s usually fine with giving it 2 cores (in most setups, on 1 socket), keeping the default "x86-64-v2-AES" type. I usually also like to give it the "Extra CPU Flag" "AES", but some people say that it's unnecessary. Then click "Next".
Then, on the "Memory" tab, it's usually enough to give it "2048" MiB of RAM for normal firewall and VPN usage. If you are going to use IPS and IDS, I recommend bumping it up to at least 8 or 12 GB though. I usually also turn off "Ballooning Device" for OPNsense, since it's not fully supported in FreeBSD (which OPNsense is based on) and can be unstable. Then click "Next".
In the "Network" tab, you are going to assign the first NIC. You can only add one here though, so we will add the remaining two later. Here, I recommend to select the "WAN Bridge", turn off "Firewall" (since we are not going to use Proxmox built-in firewall), and set "Multiqueue" to "2" (or the amount of CPU cores you have given to the VM, if different). Then click "Next" and "Finish", if everything looks good.
After that, you are not completely done with the VM yet. You still need to add those two other network bridges. But this is easily done, just go into your VMs settings under the "Server View", go to the tab "Hardware" and click "Add" -> "Network Device". You should start with adding the "LAN Bridge" since it gets easier to identify later. You don’t need to tag any VLANs or use the untagged VLAN specific bridges, OPNsense is only going to operate with tagged VLANs on the LAN interface since it's going to handle all the inter-vlan routing and be "the core". But still remember to turn off the "Firewall" (the Proxmox built-in) and set "Multiqueue" to the number of CPU cores you earlier gave the VM. Then, lastly, you should add the "MGMT Bridge" as a third Network Device. This entire physical NIC is going to live on VLAN 99 so you don’t need to tag any VLANs here either; it's going to get untagged / access VLAN 99 traffic. But still, turn off the built-in Proxmox firewall and set "Multiqueue" to the number of CPU cores.
Then you can finally boot it!
Installing OPNsense
When you start the VM, OPNsense will begin to boot. It will soon say:
Press any key to start the manual interface assignment:
Press a key!
Ignore setting up LAGGs and VLANs for now, we will do that later in the GUI. Then comes the options for setting up the interfaces. Here is when it starts to become interesting. When it asks for the WAN interface, you could now enter the name of it (typically "vtnet0"), since it was the first network device that you added to the VM. Then, it asks for the LAN interface, and you can now enter the name of it too (typically "vtnet1"), since it was the second network device that you added to the VM. Lastly, it will ask for a Optional interface (OPT1) and here, you enter the name of the MGMT interface, i.e. typically "vtnet2", since it was the third network device that you added to the VM. Then you hit enter (if you don’t have any more interfaces to assign) and continue!
You will soon reach the login screen. Here, it is important to log in with the correct user. If you log in as "root", the system will continue to run in live mode (i.e., it will not install anything on the disk and save any configurations, just run completely live from the RAM), and if you log in as "installer", it will actually give you the option to install OPNsense on the disk. This is what you want to do.
Default user: installer
Default password: opnsense
When you have logged in as installer, an installation wizard GUI will soon pop up. Now, you can first choose your keyboard layout (default for US / English, I personally selected Swedish). Then you can choose how you can install it, either UFS or ZFS. I personally chose UFS since ZFS isn't really needed here. Then select the correct disk to install it to (which is not the DVDROM). Then choose if you want a swap partition, I recommend it since it's very annoying if you ever run out of RAM. Then confirm it and continue. It will soon ask if you want to change the root password (which I highly recommend to do), and then to complete the installation ("Exit and reboot").
Then, you could plug your WAN cable into your Proxmox server's WAN port and boom, it should be working! You could also plug in the Proxmox server MGMT port to your core switch but you will not be able to access it there yet.
Configuring OPNsense
Now, you should be able to access the OPNsense Web GUI at the default router IP address, which is usually
https://192.168.1.1
When you have logged into the Web GUI as the root user with the new password, you will come to the OPNsense dashboard. I then recommend going through the configuration wizard under the "System" -> "Configuration" -> "Wizard". Here, you should define the hostname of the OPNsense host, the IP subnet of the LAN etc. (here, you could change so your entire network uses the "10.x.x.x" address).
Plugins
You can install plugins in OPNsense under the "System" -> "Firmware" -> "Plugins". I first recommend you to install the "os-qemu-guest-agent" plugin, go into its settings under "Services" -> "QEMU Guest Agent" -> "Settings" and "Enable Service".
VLANs
You should now create the VLANs in OPNsense that you already have in your network. You do that under "Interfaces" -> "Devices" -> "VLAN". Here, you just click the "Add" button, choose the "LAN" interface as "Parent" (most often the "vtnet1" interface), write the number of the VLAN ID / tag and then choose a VLAN priority for the QoS.
Interfaces
Now, you should create all the interfaces for the VLANs (to create gateways for each VLAN). You do this in the "Interfaces" -> "Assignments" menu. Then, their VLANs are finally ready to be used.
Lastly, we need to assign an IP address to the MGMT interface in OPNsense (the one connected to the management network bridge). This IP should be on the management VLAN (in my case, VLAN 99) and will be used to access the management interface on the OPNsense (the Web GUI, SSH etc.).
Management access
We haven't configured inter-VLAN routing yet (that will come in another article), so we need to hold off on this step. But when the inter-VLAN routing and firewall rules are configured (and we can reach VLAN 99 from an MGMT VPN), we will move over Proxmox's management to VLAN 99 (also on the physical OOB management port, which is fully isolated and only reachable from either the physical port or the MGMT VPN), and disable management access on all other VLANs in OPNsense.
Final notes
This is how I usually set up OPNsense virtualized on Proxmox. But once again, it was quite a while ago that I actually did it (full scale), so I'm not sure if I have forgot to document anything in this article. But anyways, you are free to follow this as a guide and please write down in the discussion section if there is something I forgot to mention, and I will make sure to update it ASAP.
I will soon write more articles about how to set up DDNS, WireGuard VPN, firewall rules etc. in OPNsense so stay tuned!
Thank you for reading! Keep labbing. :)